This is part II of SSL in WebLogic Server that covers creating KeyStore, generating Certificate Signing Request (CSR), importing Certificate in KeyStore, and finally using this keyStore with WebLogic Server. I strongly recommend to go through Part I “SSL in WebLogic KeyStore, Identity & Trust Store, Root and Intermediate CA“
High Level Steps to configure SSL in WebLogic Server are
1. Create Java KeyStore (JKS) and generate key
2. Generate Certificate Signing Request (CSR)
3. Send this certificate request file to CA to issue certificate
4. Import Root CAs certificate
5. Import intermediate CAs certificate (If any)
6. Import certificate issued by CA
7. List content of keystore
8. Configure SSL in WebLogic Server
–8.1 Change KeyStore type in WebLogic Server
–8.2 Specify path of Identity KeyStore and Trust KeyStore
–8.3 Specify Private Key Alias in WebLogic Server
–8.4 Enable SSL in WebLogic Server
9. Test SSL in WebLogic Server
Low Level Steps to configure SSL in WebLogic Server
1. Create Java KeyStore and generate key: First step is to create KeyStore and private key (If you already have a keyStore then you can use that to generate key)
keytool -genkey -alias myAlias -keyalg RSA -keysize 2048 -dname “CN=serverName, OU=MyOrganizationUnit, O=myOrganization,L=myLocation, ST=myState, C=myCountry” -keypass [privat_key_password] -keystore [keystore_name].jks -storepass [keystore_password]
____
[aiam@innowave21 ~]$ keytool -genkey -alias innowave21 -keyalg RSA -keysize 2048 -dname “CN=innowave21.focusthread.com, OU=DBATeam, O=onlineAppsDBA, L=London, ST=London,C=GB” -keypass welcome1 -keystore innowave21.jks -storepass welcome1
[aiam@innowave21 ~]$ ls *.jks
innowave21.jks
_____
Note:
a) This step will create Keystore [keystore_name].jks
b) keytool utility is a Key and Certificate Management Tool and is available in $JAVA_HOME/bin
c) -genkey option signifies that we are generating private keys
d) -alias myAlias : Each entry in KeyStore (JKS) is represented by Alias. When you import signed certificate (issued by CA) in KeyStore then you should use same alias (used during key generation)
e) -keyalg RSA : is algorithm used to generate keyPair (default algorithm is DSA)
f) -keysize 2048 : is size of key used to generate private key
g) -dname : represents name of server to which certificate key is created. If you are generating keys for server innowave21.focusthread.com then use CN=innowave21.focusthread.com, OU=………
2. Generate Certificate Signing Request: Next step it so generate Certificate Signing Request (CSR) for Key (with alias innowave21) generated in previous step
keytool -certreq -alias myAlias -keystore [keystore_name].jks -storepass [keystore_password] -file [certificate_request].csr
_____
keytool -certreq -alias innowave21 -keystore innowave21.jks -storepass welcome1 -file innowave21.csr
[aiam@innowave21 ~]$ ls *csr
innowave21.csr
_____
a) This step will create certificate signing request file
b) -certreq signifies that we are generating certificate signing request file
c) -alias myAlias must be same as one used during key generation in previous step
3. Send this certificate request file to Certifying Authority (CA) to issue certificate
4. Import Root CA certificate.
Once you receive certificate for your server then you must import certificate of Authority issued the certificate (before importing certificate issued by CA)
keytool -import -trustcacerts -alias rootcacert -keystore [keystore_name].jks -file rootCA.cer -storepass [keyStorePassword]
a) This step will import certificate of Certifying Authority (CA) with alias as rootcacert in KeyStore
b) -import signifies that we are importing certificate in keystore
c) -trustcacerts signifies that we are importing trusted certificates (In this case KeyStore is acting as trust Store, remember trust store and identity store discussed in part I ??). If you don’t use option -trustcacerts then it will try to import certificate as Identity Certificate
d) -alias must be different from one used during key generation
e) -file rootCA.cer is file that contains certificate of Root Certifying Authority (remember Root and Intermediate Certifying Authority discussed in part I ?? )
5. Import intermediate CA (If Any) certificate
If there are more than one Certifying Authority (CA) then you must import any intermediate CA
keytool -import -trustcacerts -alias intermediatecacert -keystore [keystore_name].jks -file intermediateCA.cer -storepass [keyStorePassword]
a) -import signifies that we are importing certificate in keystore
b) -trustcacerts signifies that we are importing trusted certificates (In this case KeyStore is acting as trust Store, remember trust store and identity store discussed in part I ??). If you don’t use option -trustcacerts then it will try to import certificate as Identity Certificate
c) -alias must be different from one used during key generation or while importing root CA
d) -file intermediateCA.cer is file that contains certificate of Intermediate Certifying Authority
6. Import Server Certifucate
Next step is to import Server Certifictae
keytool -import -alias myAlias -keystore [keystore_name].jks -file servercert.cer -keypass [keyPassword] -storepass [keyStorePassword]
a) -import signifies that we are importing certificate in keystore
b) -alias myAlias should match with Alias used during generation of Key
c) -file servercert.cer is file that contains certificate of server issue by CA
7. List content of keystore
If you want to view certificate stored in KeyStore then you can use option -list like below
keytool -list -v -keystore [keystore_name].jks -storepass [keyStorePassword]
8. Configure SSL in WebLogic Server
In steps above Trust Store (store containing Root and Intermediate CA) and Identity Store (store containing Server Certificate) are same i.e. [keystore_name].jks .
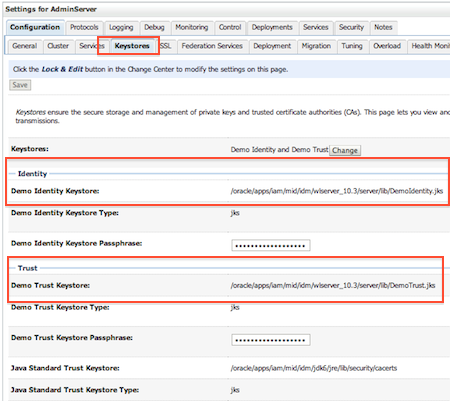
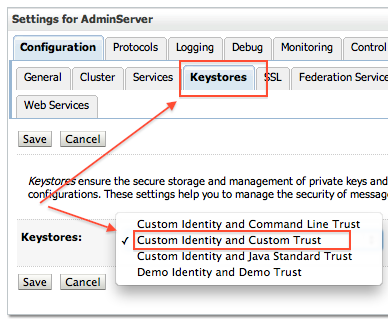
8.1 Change KeyStore type from “Demo Identity and Demo Trust” to “Custom Identity and Custom Trust”
WebLogic Server Console -> Name of Server (for which you wish to configure SSL) -> Configuration -> KeyStores -> change (next to Key Stores)
![ssl_7]()
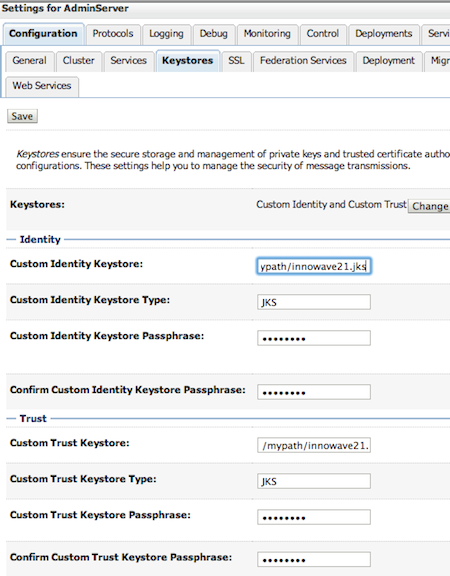
8.2 Specify path of Identity KeyStore and Trust KeyStore
In steps above Trust Store (store containing Root and Intermediate CA) and Identity Store (store containing server certificate) are same i.e. [keystore_name].jks (innowave21.jks in my case).
- Specify passphrase as password used for KeyStore
![ssl_8]()
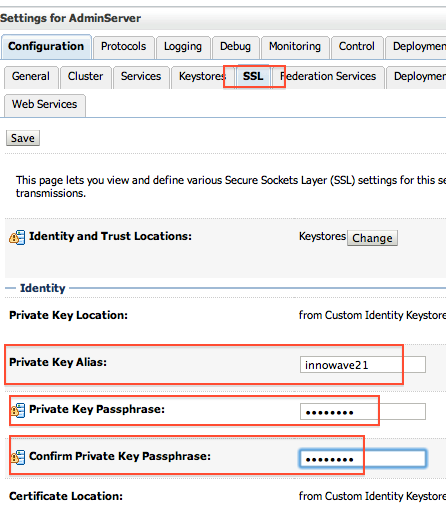
8.3 Specify Private Key Alias in WebLogic Server
Enter the Alias you used during creation of certificate request and password of KeyStore
WebLogic Server Console -> Name of Server (for which you wish to configure SSL) -> Configuration -> SSL
![ssl_9]()
8.4 Enable SSL in WebLogic Server
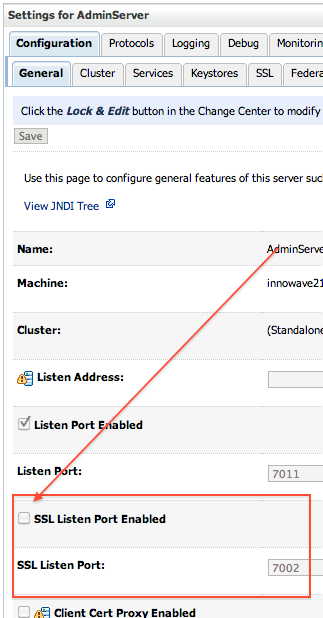
Finally enable SSL in WebLogic Server ; WebLogic Server Console -> Name of Server (for which you wish to configure SSL) -> Configuration -> General
![Enable SSL in WebLogic Server]()
9. Test SSL in WebLogic Server
https://<hostName_of_WebLogic_Server>:<SSL_ListenPort>
References
Related Posts for Learn WebLogic with Us
- Oracle WebLogic Installation Steps
- Domain , Administration & Managed Server, Cluster in Oracle WebLogic
- Create Domain in Oracle WebLogic
- Oracle WebLogic Server – Startup/Shutdown
- Oracle WebLogic Server 10g R3 10.3 is out now
- Deploy Application on Oracle WebLogic Server
- Cluster Architecture : Oracle WebLogic Server
- Start WebLogic Server on Linux on port 80, 443 <= 1024
- JDBC (Java DataBase Connectivity ) in Oracle WebLogic – Overview
- WebLogic Server JDBC for Database connection : Step by Step
- Security in Oracle WebLogic : Realm, Security Provider, Authentication, Authorization, Users
- Deploy ADF application to Oracle WebLogic Server
- Node Manager in Oracle WebLogic Server
- Configure Oracle HTTP Server infront of Oracle WebLogic Server mod_wl_ohs
- How to install weblogic server on 64 bit O.S. (Linux /Solaris) ?
- Oracle WebLogic Login Issue : Password is not correct (Password Lock Policy)
- Oracle WebLogic Server : Node Manager in nutshell
- Certification : 1Z0-108 Oracle WebLogic Server 10g System Administrator Certified Expert
- How to integrate WebLogic with Oracle Internet Directory for Login : Authentication
- opatch, adpatch and now “smart update” (BSU) to apply weblogic patches
- Disater Recovery documentation for Oracle WebLogic Server 11g (Fusion Middleware)
- Authentication Providers in #WebLogic – Oracle Access Manager Identity Assertion for Single Sign-On and OAM Authenticator
- Error while starting WebLogic Server : java.lang.NumberFormatException: null
- #WebLogic startup prompting from username password : boot.properties
- BEA-000286 : Failed to invoke startup class “JRF Startup Class” oracle.jrf.wls.JRFStartup
- WebLogic Kerberos (SSO) Authentication Issue : Error 401 Forbidden : No Configuration was registered that can handle the configuration named com. sun. security. jgss. krb5. accept
- How to reset Lost Oracle WebLogic Password for Fusion Middleware Applications
- Oracle WebLogic Server Certification : 1Z0-108 Practice Question and Dumps
- WebLogic Startup fails with Unable to obtain lock on Server may already be running
- Oracle Weblogic 12c Launch : Attend online on 1 Dec 2011
- Oracle WebLogic 12c (12.1.1) is now available to download
- How to Install WebLogic 12C (12.1.1) on Mac
- Oracle #WebLogic Server 12c : SE vs EE vs Suite License Options
- SSL in WebLogic (CA, KeyStore, Identity & Trust Store) : Things you must know – Part I
- SSL in WebLogic Server – Part II : Create KeyStore, generate CSR, Import CERT and configure KeyStore with WebLogic
